If you’re like me you might have a reasonably large pile of fabric scraps. You don’t need them for your current project, but you also don’t want to throw them away. You don’t like the word hoarder to describe the state of your quilting area, especially if the pile of scraps can be used for something else.
Don’t let anyone judge you for your fabric scrap pile. They just can’t see the possibilities you and I can. They lack your imagination and fortitude.
We spend ages searching for the perfect quilt fabrics at the shop. Some fabrics stir up fond memories and some were just downright expensive. Maybe it’s a piece of fabric you’ve had for years or an old sheet you just can’t part with.
I tend to hold onto my scraps because it’s kind of a waste of money. Tossing out a perfectly usable, beautiful piece of fabric is silly. Let’s conserve our fabrics. Reduce, reuse, recycle right? Consider yourself an environmentalist; a conscientious fabric scrap keeper.
Organized fabric scraps for quilting.
So what can we do with all of our fabric scraps?
Crazy Quilts, improv quilts, and crumble quilts are my go to solution. There’s no set pattern and it’s entirely customizable to the fabric scraps in your collection.
“What’s the difference between crazy, improv, and crumb quilting,” you may ask. Well, I don’t entirely know. So you tell me.
Seriously, tell me what the difference is if you know.
I really should scour the internet for more information about the matter, but I got excited about this blog and just wanted to share this with you.
The one difference I do know about is that traditional crazy quilts are often made from multiple different types of fabric like silk, velvet, and so forth. They also have lovely embroidery to frame out each piece of fabric like a showcase. I do not know how to do such fancy embroidery. Consider it one of my unmastered (unknown) skills; one I may never learn.
Do you have a crazy quilt? Comment below with pictures.
Take out your fabric scraps.
Dust them off and pet them like the little gems that they are. Take a look at the different shapes. If they are less than a half inch wide this might be the time to lovingly place them into the garbage… or wad them up in a tight ball and hurl them at the wall. Hopefully, that will ricochet into a garbage bin of some kind. Whatever suits your current mood.
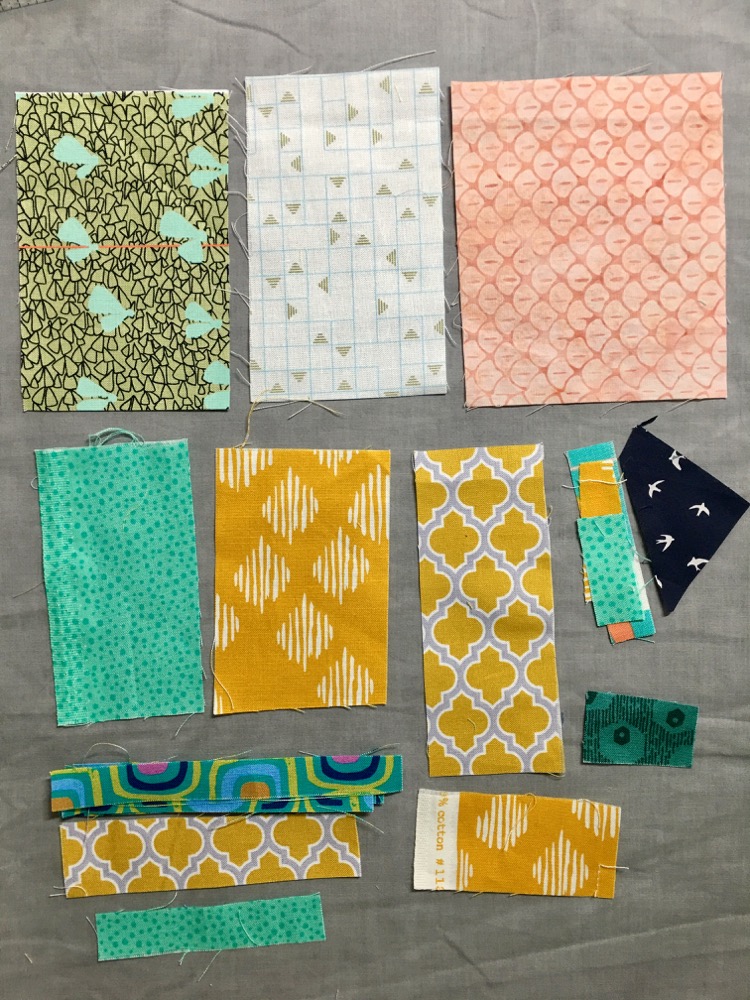
After that organize your scraps by size; smallest to biggest. It helps if you have a steady color palette. If not that’s okay, too. Color palettes are subjective. Below you can see what I started with most recently from the good ole’ fabric scraps pile.
Tiny piles of triangle scraps.
Starting to assemble scraps.
Sew into strips and blocks.
You can start multiple blocks at once.
Each block starts with a few small scraps that fit together. Just sew them up. You can let the size and shape of each scrap determine how you sew them together.
The way I like to start is just sewing together the smallest shapes and let the next smallest scraps determine kind of where they go. The rules are very loose. You can always use a longer or bigger scrap and cut it back down to size to meet your needs.
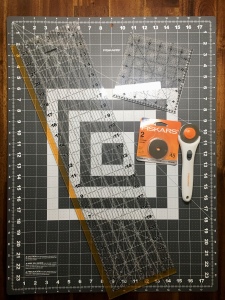
Ruler, rotary cutter, and iron.
These tools are your friends. Check out my blog about the tools you need or grab your supplies at my affiliate links here (Fiskars set and iron). Make sure your rotary blade is sharp and be careful when cutting. Keep one hand on the ruler and the other on your rotary cutter. Here’s a great video from Jenny Doan with the basics about cutting fabric.
After each seam you sew, cut the fabric down to size and square it off. Then iron the seams either to the dark side, pressed open, or all in one direction. Let’s say if I am doing a log-cabin-style pattern then I’ll press everything towards the raw edges of the fabric. But it’s up to you. Just be consistent.
Ironing your seams is importantIroning is very important after you sew on each piece. This allows your piecing to lay flat and reduce bulky seams. Here you can see the back side of my pieced block.
Log cabin-ish pattern.
I like to piece a few small bits together and then use a loose log cabin framework. The widths don’t all need to match. Nothin needs to be exact. I just use the log cabin as an example. Most likely our scraps aren’t going to lend well to a perfect pattern. You’re basically adding strips and scraps to whichever side or area where they make sense.
Go easy on yourself if it doesn’t all fit together. You can finagle the pieces or even pull from your nice, bigger pieces of fabric that aren’t technically scraps. You make the rules.
I think of it like this: Quilting is a hobby and an art form. If it doesn’t make you happy or bring you joy, then bend the rules or ditch the rules. If none of it is fun, ditch the whole thing.
For example, my first quilt was queen sized and I was hand-quilting the whole thing. Did I mention this was my first quilt? 101 rookie mistake is starting too big, or so I’ve heard.
So I ditched it. It was too hard and felt like a job. Later, I came back to it and finally finished it and was very happy. Then I lost it in the mail (very upsetting). I talk about the experience here. Anyhow, now I quilt for fun as much as humanly possible (that might be an overstatement, though).
On with it.
Triangles and little bits.
If you have a ton of triangles and odd little bits just start sewing those together. Sew as many together as you care to. You can add strips or squares to these anywhere they make sense to start getting bigger blocks. These are likely going to be the centers of your blocks. They can be fillers in other parts of your blocks, too.
Square up your blocks.
One helpful method is to eventually get your blocks to reach a consistent sized square. Say you have nine crazy/improv/crumble blocks. Each can be about 10.5″ x 10.5″ to make a complete wall hanging size of 30″ x 30″. Adjust your sizes or number of blocks depending on what size you’d like the finished quilt to be.
You can also add sashing between each block to create a cohesive look and give the eye a break between each square. Visually you are able to kind of appreciate the piecing of each block a bit more with the sashing.
Assemble your scraps.
Use your ruler to square it up.
Trim down your edges with caution.
Peel away the loose pieces.
Squared up, pieced fabric block.
Or vary your block sizes.
This method is for Tetris lovers. You’ll end up putting together a big fabric puzzle, which I think is pretty fun. So you can have a few various sizes of blocks, maybe some long ones. Eventually, you’ll need to fit them all together and that’s when the puzzle fun begins. You may need to add a couple of extra pieces of fabric here and there to get it just right.
Think about which block or Tetris style would work for your crazy quilt. What’s more your style?
Colors.
As mentioned before, I have a fairly predictable color palette. So most all of my fabrics go together. Also, I tend to buy similar styles of fabric designs. This makes picking from my fabric scraps pile easier. With a similar color palette I’m mostly focused on the sizes and don’t have to worry much about which colors to pick.
You can use any color or fabric that you want. The colors don’t really even have to match. A lot of quilters like the term “scrappy” quilt for seemingly mismatched fabrics. But everyone has their own sense of color and that’s okay.
Are you a color snob or is color no biggie (the quilting alone is proof of your artistry)?
Alternatively, you could use all blue fabrics or all polka dot fabrics or all animal prints. There are so many options of how to theme your quilt. But that’s for another blog.
Haul out your fabric scraps.
Lug them out of their long forgotten, dark cave of despair. You knew this day would come. Flipping through the fabrics takes you back in time to past projects and old favorites or those odd bits that never quite fit into your other projects.
Now is the time to play around and see what works. You can use your trusty seam ripper if something gets sewed on backwards or you don’t love a color combination, but try not to get too caught up in the nitty gritty details. Below is a slideshow of some piecing I’ve done most recently with my scraps.
Have fun with your scraps and let me know what original designs you come up with.
If you’re like me, you want to make sure you have all the things you need for your new project. You don’t want to keep going back to the store or waiting for items to get shipped over. One and done! Well, it might take more than one specific shop to get all of your supplies. I want to make a nice little reference for you (that I would’ve liked to have when I started out) outlining all the things you need, how much they cost, and why you should get them. I like to keep things on a budget, so don’t expect to see anything crazy expensive on this list. Upgrades and good quality products can definitely be good to have once you’ve tried this quilting thing out for a while and have decided you’ll be doing it for many years to come. But try it first, and then if you don’t like it, you’re not cursing yourself for buying the $7,000 Unicorn Bernina or something (even though it looks AMAZING).
Bare Essentials
Some of my links are affiliate links from which I earn a small commission. There is no additional cost to you. This helps support my blogging business and I thank you for that!
You will definitely need fabric, good quality thread, and a needle. If you don’t have any one of these items, I’m sorry, my friend, but you will not be making a quilt today. Here’s the run-down.
Fabric
You can buy pretty much anywhere. I like using old bed sheets, pillowcase covers, handkerchiefs. If you’re just starting out I think it’s okay to just use any old fabric you have that you want to use. For my first few projects I included terry cloth, velvet, men’s shirts, polyester scraps, whatever. Think about it, if we mess up, it’s not some price fancy fabric. Save those for when you’re more confident in your sewing and quilting abilities. Know that using different fabrics can mean you may want to wash on cold and hang dry. Some materials have more or less stretch to them. Purists only use 100% cotton, which is a great way to go. I see fabric bundles for sale everywhere from Etsy, Joanne’s, Walmart (which I personally boycott forever, but that’s just my MO), and even craigslist or Facebook marketplace. Thrift stores tend to have fabric scraps, binding, and really great, retro pillow cases. Once you start looking I think you’ll see fabric everywhere you go.
You can also go to online stores that exclusively sell fabric like Fabricworm (my personal favorite), fabric.com, or design your own fabric and buy it at Spoonflower.
The price varies and is determined by if you have random fabrics to use at home or want to go out and get some. If you’re going to a big box store like Joanne’s they’ll often have sales or coupons, but generally expect to pay any where between $3 and $15 per yard. A yard is usually about 44 inches. I know; weird. My latest idea is to buy muslin for quilting, which is 100% cotton and a bit less expensive than the quilting fabrics, but I’m not sure yet how it is for quilting.
Specialty quilt shops will have slightly higher prices, but check them out to see if they have sales or discount sections. Nothing beats chatting up people at quilt shops. They’re usually very helpful and friendly.
If you want a little more variety will your purchase try getting a jelly roll or fabric bundle from Moda Fabrics. These will cost a bit more, but I hear they are lots of fun. I still haven’t bought one of these because I am so particular about which fabrics I want. I’ll usually see two or three in a bundle that I want, but then not quite love the rest of the fabrics included. The bundles are really nice in that they have a good variety of colors that go with each other and a good variety of design types. (I think there’s a formula to putting together a fabric collection for these bundles and I hope to learn more about this to share with you).
Threads
You’ll need threads for your needle, winding up your bobbin (goes under the presser foot and under the clear plastic piece on your machine), and to thread into your machine from the top. I usually get the basic Coats and Clark All-Purpose to thread into my machine and for basic piecing/sewing for around $4. I keep a big cone of thread to wind up the bobbin. Whether you want to get all cotton or polyester is up to you. Whatever you do, DON’T put quilting thread into your machine. This is waxed thread that is only to be used for hand quilting. It will seriously mess up your machine and, at the least, potentially break your needle. A lot of quilters swear by Aurifil and this is definitely a place where you may want to spend a little more for the good-quality material. After all, thread is what holds your quilt together! I should probably step up my game and start buying better thread and take my own advice. As you’re learning I think it’s okay to use the Coats and Clark, but you can make the call. There’s no right or wrong answer here.
Needles
No, not Arya Starks weapon of choice. Though I’ve pricked my fingers more times than I could count. Needles go in your machine and you can use needles to quilt by hand. I think the general recommendation is to switch your machine needle for every four hours of use. I’m dreadfully behind on this as I just found out about this advice a few days ago.
For quilting by hand, it’s best to use small, thin needles that will make it easier to load up your needle and pull the thread through for various fabrics. I happened to have some old needle kits lying around the house, so I tend to use whatever I can find. I did, however, learn that using the more appropriately sized needle makes it way faster and less of a potential headache. The ones I linked up are around $4.
Highly Recommended
This section is all about making your journey into the quilting world more pleasure-filled. It’s a fun hobby, so don’t make it a grueling task that sucks the life out of you, right?
Sewing Machine
You’re going to probably want a sewing machine, first and foremost. There was a time when people didn’t have sewing machines and now we live in modern age where we can buy a decent machine and have it delivered to your doorstep. My machine was a gift from my mom and I’m so lucky to have it. She got the Brother XR3774, which I think is a great beginner machine for just under $100. It has all of the basic stitches for your needs. I mostly use the straight and zigzag stitches. I’ve also used a Pfaff sewing machine and that worked really well. But those are the two kinds I’ve used the most. I’ve heard wonderful complements about Bernina, Handi Quilter, Janome, and Singer.
The sewing machine will help you sew your quilt blocks together super fast. You can even chain piece to make the process quicker. You can use the machine for “machine quilting” or quilt by hand with your needles. My first quilt was queen-sized and hand-quilted. It took years between basting the quilt sandwich (quilt top, batting, and backing) together and finishing the hand-quilting and binding. Mostly, this was because I kept putting it in the closet to finish later.
What I’ve started doing lately is machine quilting to stitch in the ditch (to help hide the stitches) and that kind of acts as my basting. Then I hand quilt to fill in the gaps. I’ve been told about an inch is the optimal width between stitches.
Check out your sewing machine’s manual for all the details on how to work it.
Rotary Cutting System
To make help measure and cut the perfect patterns get a healing cutting mat, a clear, slip proof ruler, and a rotary cutter with additional blades. I really like the Fiskars brand as you can probably tell. The kit is just under $30 for a cutting mat, big clear ruler, and rotary cutter. Though, OmniGrid makes particularly good rulers that are slip proof.
It’s a real issue to have your ruler slip when you’re in the middle of cutting a piece of fabric. Alternatively, you can put masking tape or velcro on the bottom side. OmniGrid also makes InvisiGrip which is little clear dots to put on your rulers, too, but I haven’t used those. I’ve also heard that you should never place a flat palm on your ruler while cutting fabric as this will lead to slipping. The ideal is to only use your finger tips against the ruler making your hand look like a cup, if that makes sense.
You may end up wanting additional rulers to help with specific patterns. There are many to choose from and you can find them all at Joanne’s, Amazon, and your local quilt shop. You can also find many different rulers on quilters’ websites that they offer.
Ironing
You can make quilts without an iron, but if it’s a complex pattern or has lots of pieces, or is quite large I wouldn’t recommend that route. If you aren’t ironing between each stage of piecing your quilt is gonna be a bit wonky. An iron is good for your your quilts and can be used for your clothes, too (it’s a thing). Maybe you can borrow one from a friend or family member or get a cheap one at the local thrift store. I have a pretty simple Black and Decker iron that cost around $13. You may be sensing a theme: I don’t spend exorbitant amounts of money on supplies. I try to keep my costs low when possible.
In terms of ironing surfaces, you really can just fold and stack towels on a table and be fine. Due to a recent downsizing (which I explain in my first blog) we have a total of three towels with no spares for a ironing board substitute. So I got an ironing mat, which I didn’t even know existed. It’s simple, inexpensive, doesn’t take up a lot of space, and I can fold it away when not in use.
Fabric Scissors and Other Snippers
I will admit this is a fancy item; I have a pair of Gingham fabric shears. They stay in their box. It was a gift. Nobody can touch your fabric shears; that’s an important rule. You can’t use fabric scissors for anything besides cutting fabric or threads. I’m seeing prices from $25-$40, but there are other brands that can work just as well. This is totally up to you, but it may be worthwhile to have this be one of your upgrade items. Just imagine cutting into your fancy new fabric and your shears are dull. This’ll just waste your fabric and maybe cause a few tears. No judgement.
Otherwise, it’s useful to have small snippers for threads and a seam ripper (sometimes referred to “Jack the Ripper”). I couldn’t find the exact link for the thread clippers I have, but there are a wide variety and for not too much money, like around $5-10. I’ve seen a few kits with small clippers and seam rippers, but mine have been working just fine for me for the past five years or so. These typically can last quite a while.
Pins, Pin cushions, Safety Pins, and Clips
These are essential for holding your fabrics together, especially when you have long strips to sew and are trying to match up corners and seams for your pattern. Pins are really useful for curved piecing, too. I just have one pincushion and that works for me, but having two will make your life easier as you pin typically at the cutting or ironing area and remove pins at the machine. Unless you get one of those handy wrist pin cushions I keep seeing. I also keep seeing clips for sewing, in lieu of pins, and I must say they look like fun. I just haven’t bought any yet. Safety pins are good to have for basting your quilt if you don’t feel like going through the traditional sew-basting method, which I find laborious. Though sew-basting is probably going to give you a better result as it’s a bit more controlled.
Other Stuff
When you get into patterning and wanting to keep things orderly, it’s nice to have some scrap papers or post-it notes along with a pen or pencil. I’m guessing you already have something like this lying around the house, so you won’t need to go buy anything.
There are lots of other things you can get like the specialty rulers I talked about before, chalk pencils for marking your fabrics, a stiletto to help nudge your fabric under the presser foot, templates, a design wall that you can use to lay out your blocks, project bags (or a sturdy ziploc), and much more. I feel like all this stuff is optional and once you start to really fall in love with quilting. Also, you can tell your friends or family, “Hey, I’m really into quilting and would love [insert here] for my birthday.” That’s a pretty cool strategy.
Take a Class
I will say the best thing to do is take a class at a local art center; either sewing basics or quilting for beginners. As it worked out for me, I wasn’t very knowledgable about sewing, but the teacher in my beginning quilting class at the Hyde Park Art Center in Chicago was very helpful with all things to do with the sewing machine. I also took some quilting classes at Lillstreet Art Center. At the time I was following around my teacher Sarah Nishiura, because she was incredibly patient with all of us and eventually I found out how wonderful she is at making quilts. If you look at one single link on this blog, make it her website. You will love her work.
So find an art center or your local quilt fabric store, quilt guild, or Joanne’s to see if they host classes. You can go to this QuiltingHub website to find classes, fabric shops, events, and more. I just plugged in my address into the first line without filling in the other lines and all my local quilt shops and events popped up. Pretty fun stuff. You can plan trips with this, too, if you start to feel some of that good ole’ quilting fever while you’re on vacation.
Prices will definitely vary depending on where you go, but sometimes you can find inexpensive classes. If you want to spend zero dollars on classes, YouTube is a great place to find them. I love the partnership between BluPrint and Angela Walters (beginner quilt tutorial here). She offers many free patterns and will have a video tutorial to follow along. In my last blog I showed you a quick project from this duo that I was able to make in about two hours; a zippered pouch. YouTube is an absolute treasure chest full of tutorials for complete patterns and just for specific techniques, like curved piecing.
Start Quilting
It might take a little bit to get all of your materials, but once you do just find an hour or two to sit down and play with sewing and quilting. While you’re waiting on supplies search around youtube and save a list of tutorials or quilt-a-longs that you’d like to try out. Make it fun and keep it simple. The big mistake I made while first starting is making my first project a queen sized quilt. It made the process feel like a job sometimes, especially when trying to get through the hand quilting part. Now I mostly do mini quilts, big mini quilts (28″x32″), and have one big project I just know is going to take a while. mini quilts are a great way to try different patterns, block designs, and see what you enjoy making. The quilt as you go method is a great way to sew all these blocks together at the end for a big finished project.
Below I’ll link a few products for you that I’ve mentioned above so it’s in a more concise area. Enjoy the day and maybe sketch out a few simple block ideas for your future project. I hope this has been a helpful resource for you and doesn’t seem too daunting. Let me know what other topics you’d be interested in hearing about by leaving a comment.
I’ve discovered a trigger for my own neuroses, my anxieties. It’s not getting things done early in the day before I go to work. You see I am very much a creature of habit. I get up early with my dog and cat. Harold, the dog, needs medications before breakfast and the cat, Maude, she just starts meowing early. The only way to calm her meowing is to get out of bed. Also, my whole life (up until my current profession) I’ve been a morning shift kinda gal. I like to get up, get things done, and then relax in the evenings.
Well, now I work evenings. So what have I done in order to be more productive in the mornings? I have an online class and I’ve started this wonderful blog. Along with the blog comes a lot of sewing. Well, I guess the sewing came first and then the blog.
So what do you do when you want to get something done quickly just to get that crafty fix like me? I swear it’s like an addiction, but like a more productive and healthier one than, say, illegal drugs. (Don’t do drugs).
The lesson I’ve learned is to pick small projects or find satisfaction in accomplishing milestones for any larger project. I’m going to show you a few highlights from the past few days first; examples of small projects and milestones that gave me that fix I needed to feel accomplished enough to get on with the rest of my day. Later on I’ll show you what took me about an hour of cutting last night and about three hours of piecing and ironing today. You’ll hear about the two methods to curved piecing I tried out and which one my machine like better. I’ll explain why I agree with my sewing machine on that matter, too.
Some of my links are affiliate links from which I earn a small commission. There is no additional cost to you. This helps support my blogging business and I thank you for that!
Highlights of smaller projects and milestones
Before getting into the next bigger project, I want to share with you my little projects and milestones that gave me that creative boost I needed throughout the week. These were during times that I didn’t have enough time or all the things I needed to complete a bigger project. Without further ado I finished these two tiny quilts way back from my first days of quilting class maybe seven years ago or so. I was experimenting with these triangles. The middle piece on the left is terry cloth and on the right is luxurious black velvet. The finishing touch it took me, I kid you not, seven years to finally put on was the binding. So silly. I had thought of maybe putting these together or in another project, but finally just decided to bind them and call them done. They are slightly wider than my big smart phone and just as tall (roughly 5″x 6″).
Completed mini quilt experiments.
Another small project I had about two hours to complete is this fun one pictured below. It’s a zippered pouch I made from the fabulous and incomparable Angela Walters. She made a great series recently on holiday gifts that don’t take as much time as a full blown quilt. I was so delighted with the video and free pattern and, more so, the fact that it took such little time. It does in fact zip. The middle picture is evidence of where I accidentally started sewing my corners on the wrong side. Thank goodness for the seam ripper. Check it out:
Inside out zippered pouch
Ripping out a seam for my zippered pouch
Completed zippered pouch sewing project
My last milestone to mention was cutting out all the pieces needed for my next project (even though I haven’t yet added borders to my project from last week; I know!). I really wanted to go to town on the curved piecing and play with the new template. First step is to cut the darn fabric, people. So I found a dollop of happiness that evening with all of my pieces nicely organized by size and fabric color. I absolutely love the Robert Kaufman fabrics and got these maybe two months ago. I didn’t know what I’d do with them, then didn’t want to cut them, but ended up biting the bullet. I got half yard of each to give you a better idea.
The Four Circles Quilt
I’m calling this the Four Circles Quilt and I quite like the arrangement. Technically it’s two circles and two ovals, but that wouldn’t sound as nice, right? I’m going to show you practically step-by-step how I got through the piecing for this one. Soon I’m hoping to provide a pattern for you, so let me know if that’s something you’d like to see by leaving a comment at the end.
Heat and Bond Ultrahold for Fabrics
All the tools needed for iron on fabrics
Cutting the Heat and Bond down to size using regular scissors.
I used Heat and Bond Ultrahold to do this method to curved piecing as demonstrated in Jenny Doan’s video for Missouri Star. I’m not too sure if I got the right material as I ended up having some issues with it during the applique and piecing process. (I will say this product would work better if I hand sewed appliqued or if I wasn’t using it for a quilt in the first place. The bond is pretty strong). In the middle picture you can see the handy template I got at Joanne’s (but I’ll talk more about that in the next segment). This part seemed fairly straight forward. I used the template to help me cut out the circles of the fabric which helped quite a lot. As opposed to cutting them entirely free-hand.
All four circles cut down to size.
Flip them over with the smooth side of the Heat and Bond facing up.
Peel away the backing after you iron.
Place fabric-side up, on top of your square.
Iron by placing and holding the iron for 8 seconds at a time.
The instructions are fairly straight forward. Cut your Heat and Bond down to the correct size (you don’t want any extra flaps that can stick to your ironing surface). Place the fabric face down on your ironing surface, then the Heat and Bond with the smooth side facing up towards you and your iron. DO NOT USE STEAM. Hold the iron down for two seconds at a time to adhere everything together. Pick it up and place it down to move to any new spot and repeat until it’s done. I went over the whole thing maybe twice to make sure.
Once you’re done with all four circles, peel away the back and place on top of your background fabric square. Make sure it’s centered and then iron it on with the same process of picking up and placing the iron, but holding for eight seconds at a time.
The main advantage I found in this technique is you get sixteen curved pieces from four big blocks. I thought that sounded pretty great and like so much less work. Once you have the four pieces, find your center and cut them into four equal pieces. My blocks were 8.5 inches, so I cut at 4 and a quarter inch in both directions.
Laying out the pattern with all of the pieces.
Puzzle time; this is where you lay out all the pieces and figure out the plan of action. It’s important while sewing the pieces together that you sew them in an order that makes sense. For example, you wouldn’t want to start by sewing the whole top row together. Hopefully, the next few pictures will give you an idea for the chronology of piecing.
Careful to pinch the seam along the correct edge before sewing
Chain piecing is magical
Living room floor quilting layout on a hot day
When you have everything laid out it’s easier to keep your seems along the correct edge. I like the pinch the edge as I pick it up and then feed through the machine. Pinning or clipping is good for that, too. Did I mention how amazing chain-piecing is? I’m a fan.
Piecing the quilt
More piecing
Piecing progress
I wanted to include a glimpse at the order of piecing. Of course, there’s no absolute right way to piece this. There are, however, ways to make it go more smoothly. I like to work in small chunks of 2’s and 3’s.
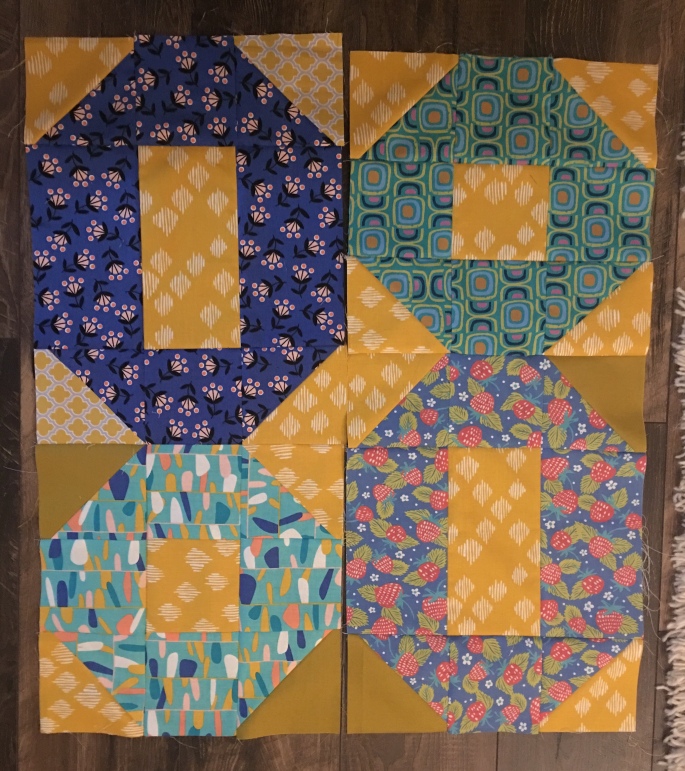
Finished the central piece to my quilt top.
I’m loving this focal point to my quilt top. I still want to add borders. Heck, maybe even add some more curves. For now I’m at a good stopping point until I can get some fabric for the borders.
Harold the Italian Greyhound
Maude the Siamese Cat
These two animals were of absolutely no help besides entertainment purposes and petting breaks. Harold and Maude are pretty cute, though, huh.
Two curved piecing approaches
There seem to be quite a few methods to curved piecing. I want to show you the pros and cons of the two methods I attempted. First, I wanted to try the pinning method. I did so with some fun fabrics from a past project.
Curved piecing using the pinning method
Curved piecing
Fold each piece of fabric along sewing edge
Pin the center point
Pin at outer edges and again between those three points
The tutorial walks you through how to pinch the middle of each piece and then pin along your seam edge. I was daunted by this method at first because using the template and getting the right measurements seemed intimidating. I just decided to take my time and only focus on these four pieces that day. I was sure with four pieces I’d at least be able to get one done correctly. Below you can see that I got all four pieces looking pretty decent to my surprise. And this is before ironing. The finished blocks are around eight square inches, but I could certainly cut it down to fit a specific project. I was happy with how these turned out, but wanted to try out the other method, too.
Curved piecing using the pinning method
The iron on method is what I used for my Four Circles quilt and looking back I sort of wish I went with the pinning method. Now I can’t be sure I used the correct brand or type of Heat and Seal. That may have been the problem. My machine was not happy with the choices I made that day. After ironing on my fabrics I tried to figure out how to make the blanket stitch. Well, I couldn’t figure the dang thing out! So I went with a different one.
Testing block for stitches
I don’t know if you could tell from the photos above, but my Brother XR3774 was not loving the Heat and Seal material. She was yelling and banging and snagging at me the whole time. I was ripping out stitches and restitching and coaxing her to, “Please work.” Asking her, “Why aren’t you happy?” It was stressful. I kept picking off little chunks of gunk from her needle and back stitching so the stitches wouldn’t skip. By golly we got the piecing done and it took a team effort. I would prefer not to subject my machine to that again, though. Do you know if I was using the right type of Heat and Seal? I’m open to comments and ideas if you know what may have gone wrong for me or how to do a blanket stitch.
Maybe I’ll try the glue basting method as shown on Fons & Porter one of these days and report back to you. There’s also the option to just sew on top with the machine and no fusing in between. In this video Pat from RYCO Creative Sewing Center is also glue basting.
Once again, thank you so much for reading and sticking it out to the very end. I hope this post has given you some ideas and maybe nudged you to try something new in your own creative endeavors. If anything, carve out a few moments of your day to create. Drop me a line or two about your latest projects. See you next time with updates on more projects.
Maybe they did for me. My mom would turn the swamp cooler on before sunrise on our ninety degree summer days. She’d draw all of the curtains closed and, when I’d wake up, she’d declare, “It’s gonna be 90+ degrees today, so we’re not leaving the house!” We are pale people, just for a little background. Plus, I would get heat rash (hives from the friggin’ sun, people) and headaches from the heat. So I was completely okay with these hot day house arrest scenarios.
One thing that would happen is sooner or later I would tell Mom that I was bored. At which point, Mom would say, “There’s no excuse for boredom. That’s not allowed in this house.” Then she’d proceed to give me a tour of everything in the house not to be bored with; books, the full encyclopedia set, endless art supplies, and musical instruments. I became the child who who spend endless hours in my room entertaining myself with art projects, reading, making puzzles, rearranging my room, and day dreaming. She trained me well and I really thank her for that.
These days my two creative outlets (did you read my first blog about creativity and hoarding?) are quilting and drawing. Drawing is my first passion in life. I remember going to Tower Movies, waiting in line to check out with Mom, and tracing the cardboard movie cut-outs with my eyes so I’d be able to draw it later at home. Soon I learned to always carry a notebook and pencil around with me.
Some of my links are affiliate links from which I earn a small commission. There is no additional cost to you. This helps support my blogging business and I thank you for that!
Recently, as of March 29th, I had decided to buy a new sketchbook after having only used my iPad for art for a solid year while we were in Oakland. I wanted to get that feeling of ink on paper again and started a self-imposed #100dayproject. Too long. I was good for a solid forty-five days, but then found myself bartering by drawing a few at a time, and then only posting one per day. Cheating. Then we moved to our current city and my mom gave me the sewing machine. So, between work and life, my creative time is spent drawing, quilting, or writing (now with the blog). There’s only so much time in the day. Plus, we want to watch an episode of That 70’s Show or whatever before bed. Needless to say, and I will say it, my drawings haven’t been getting center stage. I love to sit down with a quilt pattern idea for hours at a time. The time I’ve been spending drawing lately has been ridiculous ideas for quilt patterns. So I’m showing you a few and then I’ll show you my latest quilt pattern idea (still in progress).
First, let me show you some drawings for potential quilt patterns. Let it be known that I have a limited color palette to choose from.
Drawing of a quilt pattern
Quilt pattern drawing ideas
Drawing of a quilt pattern idea
I had this grand idea that curves would be easy; just a bunch of hand applique. Then it really sank in that it’s all by hand with that darned, wonderful invisible stitch that takes a million years. I looked at a video that shows a way to do it by machine, but am not super convinced if I like the look. I’d have to get a very similar thread, or be okay with a contrasting thread, or perhaps the invisible thread I’ve been hearing whispers about as of late. Also, what about the raw edge of fabric? Well, I looked up the drunkard’s path template and found it for around forty dollars, to which I said to myself, “That’s a firm no.”
Lo and behold a few weeks later pass and I find that same template with a no-slip feature at Joanne’s for twenty-seven dollars made by Omnigrid. To which I said, “Yes. Now a few of those patterns are a bit more attainable and I will update you on those projects as they arise.
Now to show you my latest attempt at making my own pattern. (Free sorta-pattern alert!)
This is a rough drawing of my Melva quilt pattern.
Alright, now for what I’ve – I mean you’ve been waiting for. Side note, I decided to ditch the circles for now and see how I felt about adding them or not once the quilt top is all stitched together.
Cutting pieces and improvising block sizes for the quilt
Cutting fabric pieces for my quilt
Sewing together pieces of my quilt
I start with the biggest blocks to cut out and actually cut all the pieces initially without yellow, as that was my original idea. Adding the yellow was something I wanted to add, so now I have a bunch of blue scraps. The finalized cut for the blue rectangles is 2.5 inches wide and same for the yellow pieces. The lengths vary as you can see.
Laying out pieces for the quilt
Ironing and rough measuring fabric pieces for the quilt
Piecing mistakes while I sew the quilt pattern together
I didn’t exactly measure out the additional yellow and pink triangles. Admittedly, patience is not always my strong suit. I will say that through this whole process having my pattern handy for reference helped quite a lot. All afternoon I kept looking and reaching for my sketchbook to check and recheck if everything looked how it should. Though mistakes were still made, as you will see.
Laying out fabric pieces before sewing is vital
Making mistakes still happens even when you’re careful with your quilt pattern
Luckily both mistakes were caught before getting buried in the rest of the quilt top. But let me tell you that the second mistake (pictured right) was a long seam to rip. I laid it out in front of my husband and said, “I am frustrated.” I explained the situation and he understood the problem. I sat there for a good couple of minutes and then ripped out the seam to get back to work. Sometimes you just need to talk it out, have a seat, and collect your thoughts before getting back to the task at hand.
Great stopping point for my quilt top
The chronological order of these from upper right is clockwise. So you can hopefully see through all of the pictures, the order of assembly. This was a bit of a puzzle, which is quite fun for me. The final step (left) is my stopping point. It’s now hanging on the wall waiting for a light border and all the finishing flourishes. I’m considering a yellowish cream, thick border with a dark blue binding.
UPDATE:
I have a few small, ongoing projects as I work on the big-mini quilts and, of course, stall for putting the finishing touches on my king sized quilt. I know; it’s procrastination. But I would argue that it’s productive kind of procrastination. One day I’ll take the splurge to by batting and a backing big enough to finish the Beast.
Half square triangle mini quilt with pink and mint green
Mint green A Font mini quilt
Avocado quilt in pink and mint green
You may be able to see on the avocado quilt where I’d like to do some blind stitching on the left side of the binding. Besides that, these little cuties are done.
Stay tuned next time for progress on the Melva quilt and a project I’ve been wanting to do since I got the drunkard’s path template. Enjoy the day and get creative if you get some time on a hot summer day between work and life.
Some of my links are affiliate links from which I earn a small commission. There is no additional cost to you. This helps support my blogging business and I thank you for that!
Growing up and as an adult my mom tells me that everything I do is just incredible and so much more amazing than anything else practically in existence. This is a high bar to set, right? Even more so, I have access to seeing what all is out there via the internet, Instagram, etc. So, when I show my mom something that I’ve recently made I brace myself for the elaborately unjustified compliments.
I will say I do have confidence that I am good at making art. I don’t, however, believe that I am the savior and apex of all artistic endeavors. In fact I believe that holding myself up to these standards is quite destructive. I see it in my mom and I used to be like this myself; striving for perfection and never able to attain that. It’s paralyzing and perhaps a bit of masochism, too (not that we derive pleasure from it for the true meaning of the word, but you get the idea).
You see Mom is a writer. She makes beautiful use of words and loves the language. She is the reason I, too, love the language. Growing up we always had a massive dictionary that we’d be ordered to look words up in if we didn’t know their definitions. We played games trying to make up and guess the meanings of words and, of course, played a lot of Scrabble. Mom loves her journalism classes and writes for the school’s newspaper. She writes lovely articles, but verbally abuses herself for them not being up to her personal standards of perfection. I’ve asked her, “Mom, is there any way that any article or piece of writing can be absolutely perfect, even if it’s written be a professional?” She says, “No.” Then I ask her why she holds herself up to these impossible ideals. She understands what I mean and just keeps doing the same behavior.
I’m not trying to harp on my mom. I’m not even saying not to strive for perfection or do the best you can do. What I’m trying to illustrate that, at least for me, constantly critiquing a piece of creativity and making that limit what you put out into the world is not helpful. People will connect to you through your artistic endeavors, but only if you publish them, record them, take pictures, or try selling them. For me, I used to do the same thing as Mom when I was younger to a massive scale. I would be livid if someone looked through my sketchbook without my permission. These days there definitely are pieces I don’t show people and projects that never see the light of day, but it’s a far less percentage. I guess, too, that I’ve become a much better artist from my younger days!
I will say after discussing this with my husband, not everyone is like me. Some people love to redo, revise, edit, and tweak everything until it’s perfect. They find joy in the journey towards perfection. I could be wrong, but I think quilting is a bit challenging for people like that (which is part of why I enjoy it), because constantly ripping out seams is eventually going to shred your fabrics. Most of the tweaking seams to me to be in the constructing of a pattern, which I do find enjoyable, and measuring everything like a million times before cutting.
All of that being said I have a lot of progress to make, but I want to share that progress with other people along the way. Without further ado, here is the process for making my first pattern.
Above left you can see my first rendering of the pattern. To the right you’ll see a more concise pattern with two color options. My favorite graph paper notebooks to use for quilt patterns are made by Fabriano, but there are so many great options out there.
At first I wanted to make these beautiful circles (disregard the triangle pattern at the bottom of the first image), but realized I don’t have a pricey drunkard’s path template. (I did end up finding a great template from Joanne’s as mentioned in this blog post). So I opted for those handy half-square triangles. Not perfect, but close. I found a great youtube video which shows you how to design a basic pattern from Fave Quilts. My half square triangles need an additional inch of each fabric from the desired finished block to make two finished blocks. The squares and rectangles just need an additional half inch for the seam allowance.
My vision was blue and yellow. Here’s the sequence of cutting and sewing my pattern:
I love the bright yellow with white lines, but I ran out of the fabric. So I had to improvise. Not perfect, but close. I wanted to get the tall blocks and half square triangles completed first, because they seemed like the best first steps to take. Check out my previous blog for a great video from Angela Walters showing half-square triangles made easy. I’m a big fan and watch all of her videos. For other technical help with quilting I love Fons and Porter, Quilty, Sew Very Easy, and Missouri Star. More on those later. Next step for me was assembling the small squares and the half-square triangles with squares as shown below:
I really like the process of working in small, manageable portions at a time. Whenever I had a big task in life I used to just feel overwhelmed and put it off to the last minute. Then I’d totally flip out when the deadline is the next day or something. This does nothing for my natural leanings towards anxiety (born and raised; thank you very much). So with quilting I like to keep it as anxiety-free and pleasure-filled as possible. This may be why I have no patience for perfection! If it takes me away from being able to sew in the moment (having to wait for an order, for example), then it’s not fun for me. Sewing is my hobby and there’s no point in making that stressful.
Once I got everything assembled it was fun to play with the different arrangements.
Just imagine all the possibilities. I played with the different variations for a while as it kind of celebrated the long day of completing so much of the project within an afternoon. I’d say it took three to five hours as we were entertaining guests and my set up isn’t quite the most efficient. Below you can see the final placement, which I did sew together that evening.
I felt pretty good at the end of the day and felt that it was a good stopping point, along with the fact I didn’t have any fabric for the border or binding. About a week later I had both the fabric and the time, much to my delight. This was two days ago. This is what I call a big mini quilt or wall hanging. I’m not sure if there’s an official term. The border pieces were all cut to 28 inches. There was a momentary freak out when I laid the quilt top on my batting which was just an inch shy of the right size. ARG! Ganesh suggested I sew the batting together. My first thought, just being honest, was “no way,” but I looked it up. Lo and behold, it can be done. I didn’t do it probably as gracefully as I could have, but the recommendation I found was a multi-stitch zigzag stitch and to just butt up the batting along the side that needs extra. It took a lot of going back and restitching. I figured the quilting will help reinforce everything, right? Not perfect, but close.
Okay, then I didn’t have enough backing fabric. “Oy vey! When does it end,” you must be thinking. Well, I used my stray bed sheet fabric and trust that the back of my quilt is not so pretty. Not perfect. I found a tutorial on how to make binding. I did not finish the binding in the same way as she did in the video, though. The last section of binding I sewed on is an easier way that produces less anxiety for me. I do think her way is better, but I know my way is easier. Not perfect. One day I will show you my silly, easy way to finish up binding. But now I have a finished quilt to put on our wall and make the apartment that much more cozy and colorful.
Update
There has been some progress on two of the mini quilts from the collection I started showing you in last week’s blog.
Thank you for taking the time to read about my adventures in making a pattern, not being perfect (and being okay with that), and blogging. Please contact me if you have any questions or thoughts. Constructive criticism and suggestions are always welcome. Stay tuned for next week where I’ll be working on a new, exciting pattern. Have a wonderful day and try to take a few minutes to be creative if you can.
How dare I, indeed! But, I figure, why the heck not? I’m in my thirties, work part-time and am a perpetual student of one kind or another. For the longest time my house had drawers and cabinets full of art supplies. So much, in fact, that it paralyzed me. Which medium do I choose? Too many options definitely trigger my anxiety. I’ve been making art since I can remember; either drawing, painting, or whichever new art form there was to take a class in.
A little back story about quilting; about seven years ago (maybe 2012) I took my first quilting class at the Hyde Park Art Center with an amazing teacher and artist, Sarah Nishiura. I began my first quilt there, which would take me through piecing, and beginning to hand-quilt. Through the years I would take it out occasionally to try to finish it, but I didn’t actually finish quilting the whole thing and binding it until early 2018.
Back to the story; when my husband got a job offer, in spring of 2018, halfway across the country in my home-town state, with about a month to prepare for the move something happened. I, raised as a functioning borderline hoarder, had to purge my belongings. The art room really was difficult for me (not to mention things I’d held on to for my whole life for no earthly reason). I had all of these art supplies that honestly I hadn’t touched much of for years on end. But what if I need them some day? That’s the question that always held me back from tossing them. Along with, “but this was expensive!”
I began watching decluttering videos as encouraging background affirmations while I went through my belongings. What am I currently doing with this paint? Nothing? Donate or toss! My husband and I each ended up donating tubs full of our art supplies to Project Onward at the Bridgeport Art Center of Chicago before our big move.
Most of our belongings, including our dog and cat came with us in the road trip to our new home. A few boxes had to be shipped, including my hand-quilted, queen-sized crazy quilt (you really don’t need a pattern for crazy quilts!) composed of very nostalgic fabrics from various parts of my early adulthood see above. Unfortunately, this quilt (along with other fabrics I couldn’t part with and some other valuables) were lost in the mail. Darn you, USPS! When my mom brings it up she says, “it just makes me sick to my stomach.” This is not really helpful. I try to change the subject and not think about this loss as much as possible.
The following year we spent trying to adjust to life in Oakland, CA and I solely used the Procreate app on my iPadPro for all artistic endeavors. I made lots of drawings and really loved the idea of not having to physically store all of my art. In our tiny, overly-priced studio the lack of storage space is real – along with the lack of privacy.
Some of my links are affiliate links from which I earn a small commission. There is no additional cost to you. This helps support my blogging business and I thank you for that!
One thing I did allow for myself was to buy Flow: A Book for Paper Lovers. I could get a little crafty outside of the iPad, write letters on nice paper, make little collages, and play with piecing patterns.
Luckily, Mom is super wonderful and eventually bought us a sewing machine to share. She set it up in the spare room at her house as incentive for me to visit. My idea was to make a bigger, king-sized quilt, but with more minimal piecing and strictly for machine quilting. I made good headway on this quilt top after a costly visit to Piedmont Fabrics. As a quilting novice, my pattern hadn’t been too specifically thought out and I ended up changing the color theme; opting for blue instead of mustard yellow. Below you can see the original drawing I designed on my iPadPro with the Procreate app and the nearly-complete quilt top.
By the time our lease was ending we were ready to move to my hometown with much more affordable housing and lots of trees to look at for a change. We celebrated preemptively by getting new drawing pads and pens a few days before the move. I love the soft cover blank books from Moleskine.
I will say that narrowing down the sheer amount of art media to work with has been quite liberating in terms of my psychological well-being and my bank account. I even went into the local art store just the other day with an armful of paints and a canvas until collecting my thoughts. I looked at the unruly pile and thought, “No! Put down the painting supplies and walk away.” I like the simplicity of my choices being limited to either drawing with ink on paper or quilting. They can both be as free form or planned out as necessary. With drawing I much more lean towards black and white, but quilting really is a time to have fun with colors.
As I’ve been working on the king-sized, daunting quilt task I’ve also been working on mini quilts as seems to be common practice for impatient types like myself. Above and below are a few examples of my mini quilts for your viewing purposes. First I’ll show the mini quilts I started a couple of years back, but just recently put binding on.
The latest couple of pieces I’ve been working on are mostly me trying to make flying geese patterns using colors and positioning to create different looks. Flying geese are super fun. Though I did realize I’m making it harder on myself by using an extra seam between the middle two pieces of the same color. That could just be one large triangle. I just haven’t figured out how yet. The half-square triangle method is what I’ve been using relatively successfully. You’ll see what I mean.
Half-square triangles are really a lovely, simple way to add variation to simple block patterns. They aren’t super tough and I especially love being able to make two at the same time. If you’re slightly OC about pattern orientation on your finished quilt block, then solids may be a good way to go on these, as the pattern will rotate on half of all of your pieces.
All in all, quilting has been quite a bit of fun. Currently, All of the supplies are behind our dinette table and I have to set up each time, but it’s been working out so far. Well, then when I want to iron we have less counter space to prepare food in the kitchen. Eventually, I want to install a sturdy, wall-mounted shelf for the sewing machine and whatnot. In the meantime it’s all good. Mom got me a gift certificate at Fabric Worm. Between that and the local quilting shop, I’d say the stash is at a healthy size. I will say when I first went to the quilt fabric shop I just got a few fabrics I really loved without a big plan. Then, at home, I was afraid to cut them (pure silliness). After giving things more thought I put together a smallish pattern and did the math. In the course of one day I cut through most of that new (intimidating) fabric and am pretty happy with what I put together.
In my next blog post I’d like to share with you the process for and pictures of the bigger mini quilt that’s coming from these precious pieces of fabric. Thank you for taking a look at the inner workings of my novice quilter brain.