If you’re like me, you want to make sure you have all the things you need for your new project. You don’t want to keep going back to the store or waiting for items to get shipped over. One and done! Well, it might take more than one specific shop to get all of your supplies. I want to make a nice little reference for you (that I would’ve liked to have when I started out) outlining all the things you need, how much they cost, and why you should get them. I like to keep things on a budget, so don’t expect to see anything crazy expensive on this list. Upgrades and good quality products can definitely be good to have once you’ve tried this quilting thing out for a while and have decided you’ll be doing it for many years to come. But try it first, and then if you don’t like it, you’re not cursing yourself for buying the $7,000 Unicorn Bernina or something (even though it looks AMAZING).
Bare Essentials
Some of my links are affiliate links from which I earn a small commission. There is no additional cost to you. This helps support my blogging business and I thank you for that!
You will definitely need fabric, good quality thread, and a needle. If you don’t have any one of these items, I’m sorry, my friend, but you will not be making a quilt today. Here’s the run-down.
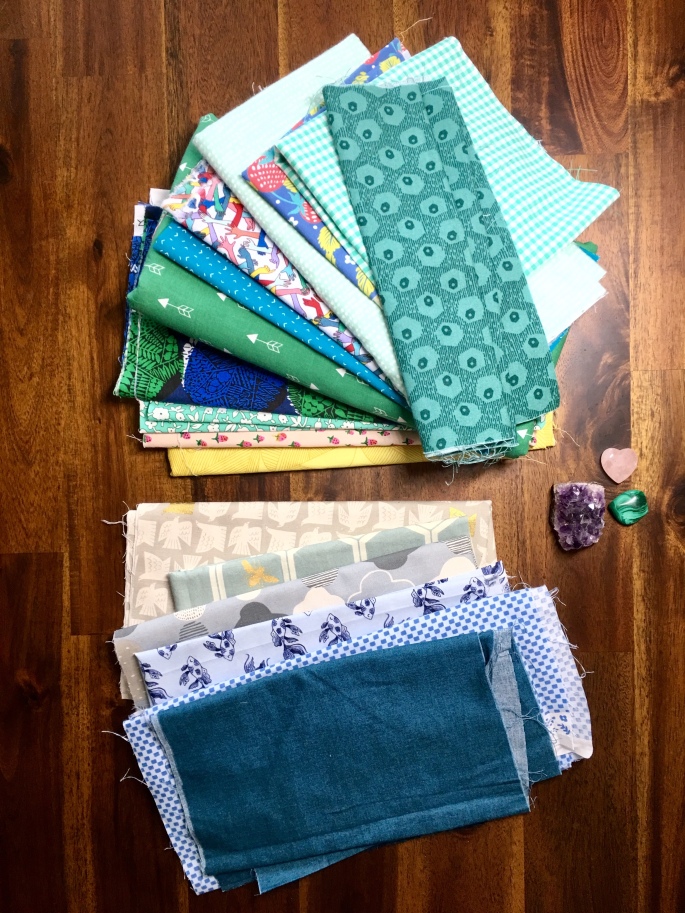
Fabric
You can buy pretty much anywhere. I like using old bed sheets, pillowcase covers, handkerchiefs. If you’re just starting out I think it’s okay to just use any old fabric you have that you want to use. For my first few projects I included terry cloth, velvet, men’s shirts, polyester scraps, whatever. Think about it, if we mess up, it’s not some price fancy fabric. Save those for when you’re more confident in your sewing and quilting abilities. Know that using different fabrics can mean you may want to wash on cold and hang dry. Some materials have more or less stretch to them. Purists only use 100% cotton, which is a great way to go. I see fabric bundles for sale everywhere from Etsy, Joanne’s, Walmart (which I personally boycott forever, but that’s just my MO), and even craigslist or Facebook marketplace. Thrift stores tend to have fabric scraps, binding, and really great, retro pillow cases. Once you start looking I think you’ll see fabric everywhere you go.
You can also go to online stores that exclusively sell fabric like Fabricworm (my personal favorite), fabric.com, or design your own fabric and buy it at Spoonflower.
The price varies and is determined by if you have random fabrics to use at home or want to go out and get some. If you’re going to a big box store like Joanne’s they’ll often have sales or coupons, but generally expect to pay any where between $3 and $15 per yard. A yard is usually about 44 inches. I know; weird. My latest idea is to buy muslin for quilting, which is 100% cotton and a bit less expensive than the quilting fabrics, but I’m not sure yet how it is for quilting.
Specialty quilt shops will have slightly higher prices, but check them out to see if they have sales or discount sections. Nothing beats chatting up people at quilt shops. They’re usually very helpful and friendly.
If you want a little more variety will your purchase try getting a jelly roll or fabric bundle from Moda Fabrics. These will cost a bit more, but I hear they are lots of fun. I still haven’t bought one of these because I am so particular about which fabrics I want. I’ll usually see two or three in a bundle that I want, but then not quite love the rest of the fabrics included. The bundles are really nice in that they have a good variety of colors that go with each other and a good variety of design types. (I think there’s a formula to putting together a fabric collection for these bundles and I hope to learn more about this to share with you).
Threads
You’ll need threads for your needle, winding up your bobbin (goes under the presser foot and under the clear plastic piece on your machine), and to thread into your machine from the top. I usually get the basic Coats and Clark All-Purpose to thread into my machine and for basic piecing/sewing for around $4. I keep a big cone of thread to wind up the bobbin. Whether you want to get all cotton or polyester is up to you. Whatever you do, DON’T put quilting thread into your machine. This is waxed thread that is only to be used for hand quilting. It will seriously mess up your machine and, at the least, potentially break your needle. A lot of quilters swear by Aurifil and this is definitely a place where you may want to spend a little more for the good-quality material. After all, thread is what holds your quilt together! I should probably step up my game and start buying better thread and take my own advice. As you’re learning I think it’s okay to use the Coats and Clark, but you can make the call. There’s no right or wrong answer here.
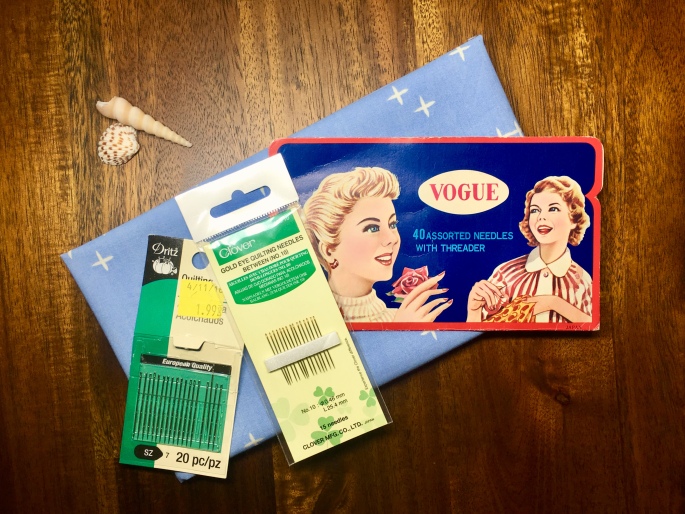
Needles
No, not Arya Starks weapon of choice. Though I’ve pricked my fingers more times than I could count. Needles go in your machine and you can use needles to quilt by hand. I think the general recommendation is to switch your machine needle for every four hours of use. I’m dreadfully behind on this as I just found out about this advice a few days ago.
For quilting by hand, it’s best to use small, thin needles that will make it easier to load up your needle and pull the thread through for various fabrics. I happened to have some old needle kits lying around the house, so I tend to use whatever I can find. I did, however, learn that using the more appropriately sized needle makes it way faster and less of a potential headache. The ones I linked up are around $4.
Highly Recommended
This section is all about making your journey into the quilting world more pleasure-filled. It’s a fun hobby, so don’t make it a grueling task that sucks the life out of you, right?
Sewing Machine
You’re going to probably want a sewing machine, first and foremost. There was a time when people didn’t have sewing machines and now we live in modern age where we can buy a decent machine and have it delivered to your doorstep. My machine was a gift from my mom and I’m so lucky to have it. She got the Brother XR3774, which I think is a great beginner machine for just under $100. It has all of the basic stitches for your needs. I mostly use the straight and zigzag stitches. I’ve also used a Pfaff sewing machine and that worked really well. But those are the two kinds I’ve used the most. I’ve heard wonderful complements about Bernina, Handi Quilter, Janome, and Singer.
The sewing machine will help you sew your quilt blocks together super fast. You can even chain piece to make the process quicker. You can use the machine for “machine quilting” or quilt by hand with your needles. My first quilt was queen-sized and hand-quilted. It took years between basting the quilt sandwich (quilt top, batting, and backing) together and finishing the hand-quilting and binding. Mostly, this was because I kept putting it in the closet to finish later.
What I’ve started doing lately is machine quilting to stitch in the ditch (to help hide the stitches) and that kind of acts as my basting. Then I hand quilt to fill in the gaps. I’ve been told about an inch is the optimal width between stitches.
Check out your sewing machine’s manual for all the details on how to work it.
Rotary Cutting System
To make help measure and cut the perfect patterns get a healing cutting mat, a clear, slip proof ruler, and a rotary cutter with additional blades. I really like the Fiskars brand as you can probably tell. The kit is just under $30 for a cutting mat, big clear ruler, and rotary cutter. Though, OmniGrid makes particularly good rulers that are slip proof.
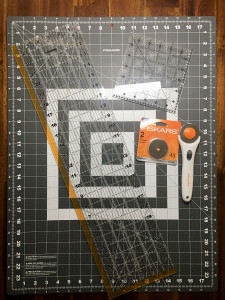
It’s a real issue to have your ruler slip when you’re in the middle of cutting a piece of fabric. Alternatively, you can put masking tape or velcro on the bottom side. OmniGrid also makes InvisiGrip which is little clear dots to put on your rulers, too, but I haven’t used those. I’ve also heard that you should never place a flat palm on your ruler while cutting fabric as this will lead to slipping. The ideal is to only use your finger tips against the ruler making your hand look like a cup, if that makes sense.
You may end up wanting additional rulers to help with specific patterns. There are many to choose from and you can find them all at Joanne’s, Amazon, and your local quilt shop. You can also find many different rulers on quilters’ websites that they offer.
Ironing
You can make quilts without an iron, but if it’s a complex pattern or has lots of pieces, or is quite large I wouldn’t recommend that route. If you aren’t ironing between each stage of piecing your quilt is gonna be a bit wonky. An iron is good for your your quilts and can be used for your clothes, too (it’s a thing). Maybe you can borrow one from a friend or family member or get a cheap one at the local thrift store. I have a pretty simple Black and Decker iron that cost around $13. You may be sensing a theme: I don’t spend exorbitant amounts of money on supplies. I try to keep my costs low when possible.
In terms of ironing surfaces, you really can just fold and stack towels on a table and be fine. Due to a recent downsizing (which I explain in my first blog) we have a total of three towels with no spares for a ironing board substitute. So I got an ironing mat, which I didn’t even know existed. It’s simple, inexpensive, doesn’t take up a lot of space, and I can fold it away when not in use.
Fabric Scissors and Other Snippers
I will admit this is a fancy item; I have a pair of Gingham fabric shears. They stay in their box. It was a gift. Nobody can touch your fabric shears; that’s an important rule. You can’t use fabric scissors for anything besides cutting fabric or threads. I’m seeing prices from $25-$40, but there are other brands that can work just as well. This is totally up to you, but it may be worthwhile to have this be one of your upgrade items. Just imagine cutting into your fancy new fabric and your shears are dull. This’ll just waste your fabric and maybe cause a few tears. No judgement.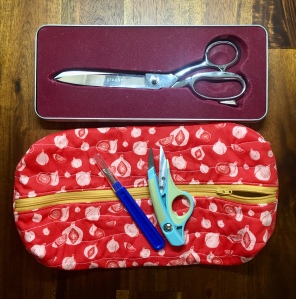
Otherwise, it’s useful to have small snippers for threads and a seam ripper (sometimes referred to “Jack the Ripper”). I couldn’t find the exact link for the thread clippers I have, but there are a wide variety and for not too much money, like around $5-10. I’ve seen a few kits with small clippers and seam rippers, but mine have been working just fine for me for the past five years or so. These typically can last quite a while.
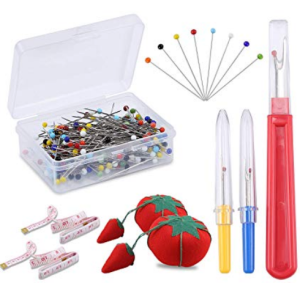
Pins, Pin cushions, Safety Pins, and Clips
These are essential for holding your fabrics together, especially when you have long strips to sew and are trying to match up corners and seams for your pattern. Pins are really useful for curved piecing, too. I just have one pincushion and that works for me, but having two will make your life easier as you pin typically at the cutting or ironing area and remove pins at the machine. Unless you get one of those handy wrist pin cushions I keep seeing. I also keep seeing clips for sewing, in lieu of pins, and I must say they look like fun. I just haven’t bought any yet. Safety pins are good to have for basting your quilt if you don’t feel like going through the traditional sew-basting method, which I find laborious. Though sew-basting is probably going to give you a better result as it’s a bit more controlled.
Other Stuff
When you get into patterning and wanting to keep things orderly, it’s nice to have some scrap papers or post-it notes along with a pen or pencil. I’m guessing you already have something like this lying around the house, so you won’t need to go buy anything.
There are lots of other things you can get like the specialty rulers I talked about before, chalk pencils for marking your fabrics, a stiletto to help nudge your fabric under the presser foot, templates, a design wall that you can use to lay out your blocks, project bags (or a sturdy ziploc), and much more. I feel like all this stuff is optional and once you start to really fall in love with quilting. Also, you can tell your friends or family, “Hey, I’m really into quilting and would love [insert here] for my birthday.” That’s a pretty cool strategy.
Take a Class
I will say the best thing to do is take a class at a local art center; either sewing basics or quilting for beginners. As it worked out for me, I wasn’t very knowledgable about sewing, but the teacher in my beginning quilting class at the Hyde Park Art Center in Chicago was very helpful with all things to do with the sewing machine. I also took some quilting classes at Lillstreet Art Center. At the time I was following around my teacher Sarah Nishiura, because she was incredibly patient with all of us and eventually I found out how wonderful she is at making quilts. If you look at one single link on this blog, make it her website. You will love her work.
So find an art center or your local quilt fabric store, quilt guild, or Joanne’s to see if they host classes. You can go to this QuiltingHub website to find classes, fabric shops, events, and more. I just plugged in my address into the first line without filling in the other lines and all my local quilt shops and events popped up. Pretty fun stuff. You can plan trips with this, too, if you start to feel some of that good ole’ quilting fever while you’re on vacation.
Prices will definitely vary depending on where you go, but sometimes you can find inexpensive classes. If you want to spend zero dollars on classes, YouTube is a great place to find them. I love the partnership between BluPrint and Angela Walters (beginner quilt tutorial here). She offers many free patterns and will have a video tutorial to follow along. In my last blog I showed you a quick project from this duo that I was able to make in about two hours; a zippered pouch. YouTube is an absolute treasure chest full of tutorials for complete patterns and just for specific techniques, like curved piecing.
Start Quilting
It might take a little bit to get all of your materials, but once you do just find an hour or two to sit down and play with sewing and quilting. While you’re waiting on supplies search around youtube and save a list of tutorials or quilt-a-longs that you’d like to try out. Make it fun and keep it simple. The big mistake I made while first starting is making my first project a queen sized quilt. It made the process feel like a job sometimes, especially when trying to get through the hand quilting part. Now I mostly do mini quilts, big mini quilts (28″x32″), and have one big project I just know is going to take a while. mini quilts are a great way to try different patterns, block designs, and see what you enjoy making. The quilt as you go method is a great way to sew all these blocks together at the end for a big finished project.
Below I’ll link a few products for you that I’ve mentioned above so it’s in a more concise area. Enjoy the day and maybe sketch out a few simple block ideas for your future project. I hope this has been a helpful resource for you and doesn’t seem too daunting. Let me know what other topics you’d be interested in hearing about by leaving a comment.
Products:
Fabric (local quilt fabric shop, fabricworm, Joanne’s fabrics, etc.)
Threads (Aurifil, Coats and Clark, etc.)
Needles (Clover “between” needles, and others)
Sewing machine (Brother XR 3774, and many other options)
Rotary System: cutter, cutting mat, ruler, and extra blades (Fiskars set)
Iron and ironing surface (Black and Decker iron, ironing mat)
Snippers: fabric shears, thread cutter, and seam ripper (Gingher)
Pins, pin cushions, safety pins, and clips (kit pictured below)