
If you’re like me you might have a reasonably large pile of fabric scraps. You don’t need them for your current project, but you also don’t want to throw them away. You don’t like the word hoarder to describe the state of your quilting area, especially if the pile of scraps can be used for something else.
Don’t let anyone judge you for your fabric scrap pile. They just can’t see the possibilities you and I can. They lack your imagination and fortitude.
We spend ages searching for the perfect quilt fabrics at the shop. Some fabrics stir up fond memories and some were just downright expensive. Maybe it’s a piece of fabric you’ve had for years or an old sheet you just can’t part with.
I tend to hold onto my scraps because it’s kind of a waste of money. Tossing out a perfectly usable, beautiful piece of fabric is silly. Let’s conserve our fabrics. Reduce, reuse, recycle right? Consider yourself an environmentalist; a conscientious fabric scrap keeper.

So what can we do with all of our fabric scraps?
Crazy Quilts, improv quilts, and crumble quilts are my go to solution. There’s no set pattern and it’s entirely customizable to the fabric scraps in your collection.
“What’s the difference between crazy, improv, and crumb quilting,” you may ask. Well, I don’t entirely know. So you tell me.
Seriously, tell me what the difference is if you know.
I really should scour the internet for more information about the matter, but I got excited about this blog and just wanted to share this with you.
The one difference I do know about is that traditional crazy quilts are often made from multiple different types of fabric like silk, velvet, and so forth. They also have lovely embroidery to frame out each piece of fabric like a showcase. I do not know how to do such fancy embroidery. Consider it one of my unmastered (unknown) skills; one I may never learn.
Do you have a crazy quilt? Comment below with pictures.
Take out your fabric scraps.
Dust them off and pet them like the little gems that they are. Take a look at the different shapes. If they are less than a half inch wide this might be the time to lovingly place them into the garbage… or wad them up in a tight ball and hurl them at the wall. Hopefully, that will ricochet into a garbage bin of some kind. Whatever suits your current mood.
After that organize your scraps by size; smallest to biggest. It helps if you have a steady color palette. If not that’s okay, too. Color palettes are subjective. Below you can see what I started with most recently from the good ole’ fabric scraps pile.


You can start multiple blocks at once.
Each block starts with a few small scraps that fit together. Just sew them up. You can let the size and shape of each scrap determine how you sew them together.
The way I like to start is just sewing together the smallest shapes and let the next smallest scraps determine kind of where they go. The rules are very loose. You can always use a longer or bigger scrap and cut it back down to size to meet your needs.
Ruler, rotary cutter, and iron.
These tools are your friends. Check out my blog about the tools you need or grab your supplies at my affiliate links here (Fiskars set and iron). Make sure your rotary blade is sharp and be careful when cutting. Keep one hand on the ruler and the other on your rotary cutter. Here’s a great video from Jenny Doan with the basics about cutting fabric.
After each seam you sew, cut the fabric down to size and square it off. Then iron the seams either to the dark side, pressed open, or all in one direction. Let’s say if I am doing a log-cabin-style pattern then I’ll press everything towards the raw edges of the fabric. But it’s up to you. Just be consistent.

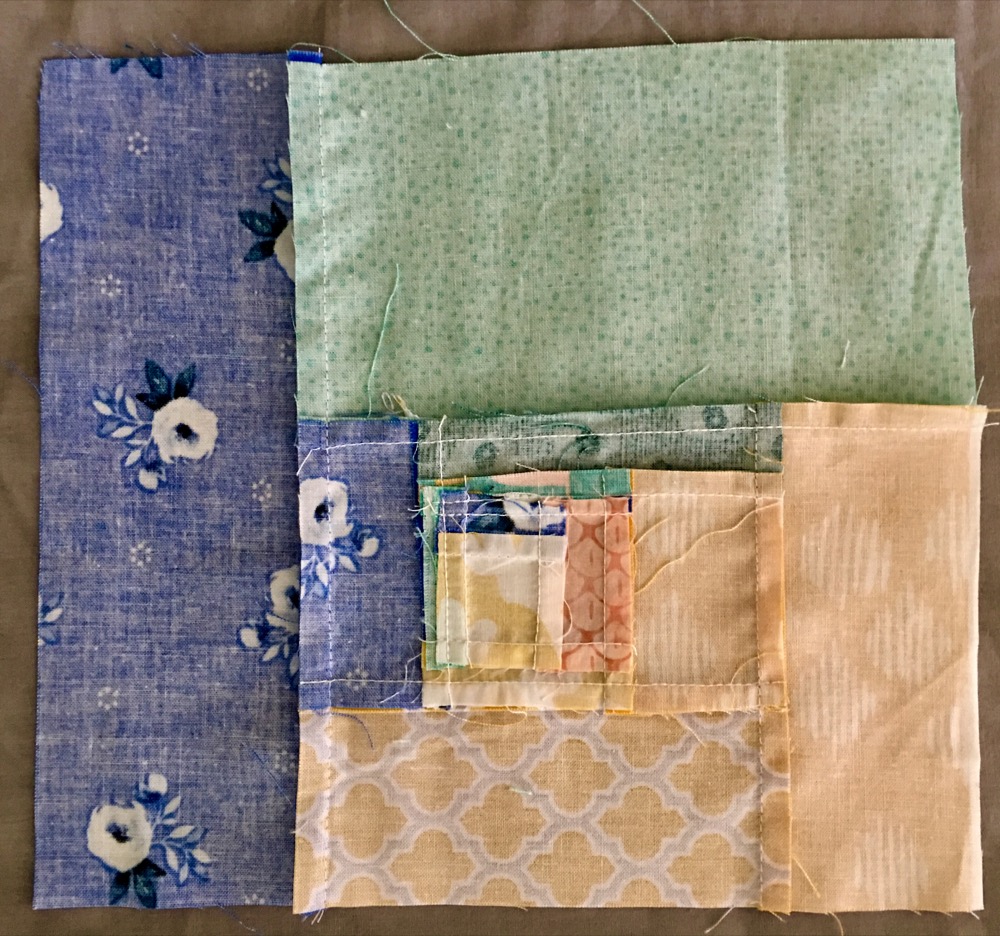
Log cabin-ish pattern.
I like to piece a few small bits together and then use a loose log cabin framework. The widths don’t all need to match. Nothin needs to be exact. I just use the log cabin as an example. Most likely our scraps aren’t going to lend well to a perfect pattern. You’re basically adding strips and scraps to whichever side or area where they make sense.
Go easy on yourself if it doesn’t all fit together. You can finagle the pieces or even pull from your nice, bigger pieces of fabric that aren’t technically scraps. You make the rules.
I think of it like this: Quilting is a hobby and an art form. If it doesn’t make you happy or bring you joy, then bend the rules or ditch the rules. If none of it is fun, ditch the whole thing.
For example, my first quilt was queen sized and I was hand-quilting the whole thing. Did I mention this was my first quilt? 101 rookie mistake is starting too big, or so I’ve heard.
So I ditched it. It was too hard and felt like a job. Later, I came back to it and finally finished it and was very happy. Then I lost it in the mail (very upsetting). I talk about the experience here. Anyhow, now I quilt for fun as much as humanly possible (that might be an overstatement, though).
On with it.
Triangles and little bits.
If you have a ton of triangles and odd little bits just start sewing those together. Sew as many together as you care to. You can add strips or squares to these anywhere they make sense to start getting bigger blocks. These are likely going to be the centers of your blocks. They can be fillers in other parts of your blocks, too.
Square up your blocks.
One helpful method is to eventually get your blocks to reach a consistent sized square. Say you have nine crazy/improv/crumble blocks. Each can be about 10.5″ x 10.5″ to make a complete wall hanging size of 30″ x 30″. Adjust your sizes or number of blocks depending on what size you’d like the finished quilt to be.
You can also add sashing between each block to create a cohesive look and give the eye a break between each square. Visually you are able to kind of appreciate the piecing of each block a bit more with the sashing.


Or vary your block sizes.
This method is for Tetris lovers. You’ll end up putting together a big fabric puzzle, which I think is pretty fun. So you can have a few various sizes of blocks, maybe some long ones. Eventually, you’ll need to fit them all together and that’s when the puzzle fun begins. You may need to add a couple of extra pieces of fabric here and there to get it just right.
Think about which block or Tetris style would work for your crazy quilt. What’s more your style?
Colors.
As mentioned before, I have a fairly predictable color palette. So most all of my fabrics go together. Also, I tend to buy similar styles of fabric designs. This makes picking from my fabric scraps pile easier. With a similar color palette I’m mostly focused on the sizes and don’t have to worry much about which colors to pick.
You can use any color or fabric that you want. The colors don’t really even have to match. A lot of quilters like the term “scrappy” quilt for seemingly mismatched fabrics. But everyone has their own sense of color and that’s okay.
Are you a color snob or is color no biggie (the quilting alone is proof of your artistry)?
Alternatively, you could use all blue fabrics or all polka dot fabrics or all animal prints. There are so many options of how to theme your quilt. But that’s for another blog.
Haul out your fabric scraps.
Lug them out of their long forgotten, dark cave of despair. You knew this day would come. Flipping through the fabrics takes you back in time to past projects and old favorites or those odd bits that never quite fit into your other projects.
Now is the time to play around and see what works. You can use your trusty seam ripper if something gets sewed on backwards or you don’t love a color combination, but try not to get too caught up in the nitty gritty details. Below is a slideshow of some piecing I’ve done most recently with my scraps.
Have fun with your scraps and let me know what original designs you come up with.


